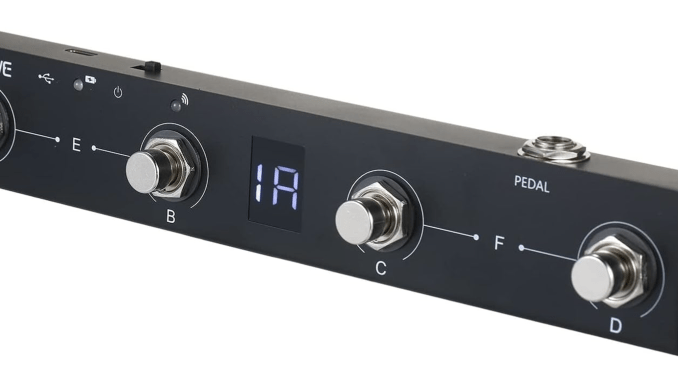
How to Use the M-Vave/Cuvave Chocolate Wireless MIDI Footswitch Pedal with Other Pedals
Hey, folks! If you’re anything like me and you’ve recently purchased the M-Vave Chocolate wireless MIDI footswitch pedal, you might be struggling to find a proper user manual. Don’t worry, I’ve got your back. While there are some lengthy YouTube videos out there created by well-intentioned individuals, I’ve prepared a concise written guide to help you out.
Note: If you purchase through links on guitarbites.com, we may receive a commission.
Step 1: Ensure you have the necessary gear
When I bought the Chocolate, I mistakenly assumed that everything I needed would be included in the box. Boy, was I wrong! Apart from the charging capability, you’ll also need the companion wireless MIDI transmission system or a TRS to MIDI cable to do anything else. Luckily, the wireless system is affordable, but it’s worth noting that the product page doesn’t mention this requirement. For the sake of this guide, I’ll focus on the wireless system rather than the TRS-MIDI option as you might want to use the TRS input on the Chocolate for an expression pedal.
Step 2: Download the companion app for your phone.
The app is called CubeSuite and can be found on the Apple Store. Presumably, it’s also available on the Samsung Galaxy Store since M-Vave/Cuvave claims to support Android devices. I cannot personally verify this as I don’t own a Samsung phone.
Step 3: Activate the Chocolate and establish a connection with the app.
Once you turn on the Chocolate, the Bluetooth LED on the device will start flashing. No additional steps are needed to enable pairing.
Launch CubeSuite and search for nearby devices, ensuring that your phone’s Bluetooth is enabled.
Select “FootCtrl” to connect the Chocolate to the app and your phone.
Step 4: Familiarize yourself with your pedal’s MIDI functions.
This part of the process requires delving into the product manuals for your pedals. The MIDI section of your pedal’s manual should outline the MIDI CC messages associated with specific functions. For example, check out this link for the HX Stomp’s MIDI list: [Insert URL Here]
IMPORTANT: During your manual deep dive, ensure that your pedal is set up to receive MIDI messages on the correct channel. Most MIDI-capable devices default to MIDI channel 1, but if you purchased your pedal used and the previous owner did not reset it to factory settings, they might have configured it to receive MIDI messages on a different channel.
Step 5: Programming Chocolate Footswitches using Advanced Custom Mode
To configure footswitch A, select Advanced Custom Mode on CubeSuite’s main screen: [insert link here]
Choose “A” to set parameters for footswitch A, “B” for footswitch B, and so on.
If you want the footswitch to perform a single action, select “mode: single step (single bank of information)”. If you want to assign a combination of short and long presses to the footswitch, choose “mode: short tread (bank A information) long tread (bank B information)”.
Click on the lower-most box to set your MIDI CC parameters.
If your pedal is set up to receive MIDI messages on channel 1, select Channel 1.
Choose Type: CC.
Enter the MIDI CC number for the assigned function into the “Data 1” field. For example, with the HX Stomp, MIDI CC #72 is used for preset selection.
Enter the value associated with the selected MIDI CC into the “Data 2” field. Referring to the HX Stomp MIDI documentation, values between 0-63 will select the previous preset, and values between 64-127 will select the next preset.
Click “Save”.
Example: HX Stomp
Let’s say you have an HX Stomp. If you use the Stomp footswitches in snapshot mode, selecting your snapshots is easy with the three footswitches. However, switching quickly between presets or other functions can be a hassle. Fortunately, you can configure the Chocolate footswitches to select the previous or next preset, toggle the tuner screen, and adjust tap tempo, while keeping your Stomp’s footswitches in snapshot mode. Referring to the HX Stomp manual, here are the values to be entered in the Chocolate’s Advanced Custom Mode:
Footswitch A (Select Previous Preset)
Data 1: 72
Data 2: 0
Footswitch B (Select Next Preset)
Data 1: 72
Data 2: 64
Footswitch C (Toggle Tuner)
Data 1: 68
Data 2: 0
Footswitch D (Tap Tempo)
Data 1: 64
Data 2: 64
Here’s a short video demonstrating this setup: https://youtu.be/j8htzbLyPjo
Step 6: To ensure successful pairing with the wireless receiver, it is important to turn off your phone’s Bluetooth or disable FootCtrl in the list of connected devices
This is crucial as the Chocolate can only connect to one Bluetooth device at a time. Failing to break the connection with your phone will prevent you from pairing it with the wireless receiver. I learned this the hard way after wasting countless hours, and I want to save you from going through the same trouble.
Step 7: Begin by pairing the Chocolate with the Wireless MIDI Receiver
Connect the wireless MIDI receiver to your pedal. Different pedals, such as the HX Stomp, receive MIDI messages either via 5-pin MIDI connectors or micro USB. Therefore, make sure to use the appropriate companion receiver for your pedal.
If you are using the Midi A receiver (5-pin connector), ensure that it is charged and switch it on (located on the underside) while the Bluetooth pairing light on the Chocolate is blinking. Refer to this image for reference: https://i.imgur.com/bSNXGN6.jpg
Originally posted on reddit r/guitar u/FuriousPorg.
Below is a Troubleshooting FAQ for the M-Vave/Cuvave Chocolate Wireless MIDI Footswitch Pedal, designed to complement the guide on GuitarBites.com. The information is sourced from user experiences, forum discussions, and product documentation available online, focusing on common issues and practical solutions for guitarists integrating this pedal with other gear. All details have been cross-checked for accuracy and relevance to ensure they address real-world scenarios.
Troubleshooting FAQ for M-Vave/Cuvave Chocolate Wireless MIDI Footswitch Pedal
1. Why isn’t my Chocolate pedal connecting via Bluetooth to the CubeSuite app?
Ensure the pedal is charged (plug it in via USB-C for 2–3 hours). Turn on the pedal; the Bluetooth LED should flash. In your device’s Bluetooth settings, select “FootCtrl” to pair. If it doesn’t appear, restart the pedal and app. On Android, confirm CubeSuite is updated from the Google Play Store; for iOS, check the App Store. Some users report needing to forget and re-pair the device in Bluetooth settings if the connection drops.
2. My pedal isn’t sending MIDI messages to my HX Stomp or other pedal. What’s wrong?
Verify the wireless MIDI receiver is charged, powered on, and paired (blue light solid, not flashing). Check that it’s plugged into your pedal’s MIDI IN port (use a 5-pin MIDI cable or TRS adapter if required). In CubeSuite, confirm the pedal is set to the correct MIDI channel (default is Channel 1) and that the MIDI CC numbers match your pedal’s manual (e.g., HX Stomp uses CC#72 for preset changes). If bought used, reset the receiving pedal to factory settings, as prior MIDI channel changes may interfere.
3. Why does the pedal trigger actions on release instead of on press?
This is often due to the pedal’s MIDI message mode. In CubeSuite, go to Advanced Custom Mode for the footswitch (A, B, C, or D) and set it to “Momentary” instead of “Toggle.” Momentary sends the MIDI command when pressed, not released. Save the settings and test. If the issue persists, check your receiving pedal’s MIDI settings for any “latch” behavior that might delay the response.
4. The expression pedal input isn’t working or behaves backward. How do I fix it?
Ensure your expression pedal uses a TRS cable and is plugged into the Chocolate’s 1/4-inch input. In CubeSuite, assign the expression input to a MIDI CC (e.g., CC#11 for volume). If the pedal works in reverse (e.g., heel down increases value), swap the min/max values in CubeSuite’s expression settings (set Data 2: 0–127 to 127–0). Some pedals may need calibration—check the CubeSuite manual for firmware updates that include calibration options.
5. Why does the pedal stop responding after a few minutes?
This could be a battery or pairing issue. Charge the pedal fully (LED turns green when complete). If using Bluetooth, ensure the receiver and pedal are within 10 meters and free of interference (Wi-Fi routers can disrupt signals). Re-pair both devices via CubeSuite. If using USB-MIDI, try a different USB-C cable or port, as faulty cables can cause dropouts. Updating the pedal’s firmware via CubeSuite may also resolve intermittent issues.
6. I can’t get the pedal to work with Amplitube or other DAWs. What should I do?
For DAWs like Amplitube, connect the pedal via USB-MIDI or the wireless receiver to your computer. In CubeSuite, set the footswitches to send MIDI CCs compatible with your software (e.g., CC#64 for bypass in Amplitube). In your DAW, go to MIDI settings and select “FootCtrl” as an input device. If it’s not recognized, restart the DAW and pedal. For Windows, ensure MIDI drivers are updated; for Mac, no extra drivers are typically needed. Test with a simple MIDI CC (e.g., bypass) before complex setups.
7. The CubeSuite app crashes or won’t save settings. How can I fix it?
Update CubeSuite to the latest version from cuvave.com or your app store. Clear the app’s cache (on Android: Settings > Apps > CubeSuite > Storage > Clear Cache; on iOS, reinstall the app). Ensure your phone has enough storage and isn’t running heavy apps in the background. If settings still don’t save, connect the pedal via USB-C instead of Bluetooth to rule out pairing issues. As a last resort, reset the pedal by holding the “A” footswitch while powering on, then reconfigure.


